¶ Getting Started
If you want an in-depth guide, look at this awesome one.
Otherwise here will be a quick introduction to Kubernetes and how to develop your application for it.
¶ What is Kubernetes
Remember Docker Compose? Yeah, it's a little bit like that, but on steroids.
Kubernetes is a container orchestrator, that means it manages deployment, lifecycle, ressources and much more about deployed containerized applications. So when you deploy your app, Kubernetes pulls your image, decides where to deploy your application (if you have a multi-node cluster), creates replicas, restarts your applications when they die, and also manages networking inside of your cluster (with some help).
So what are the main components of a typical Kubernetes deployment? Glad you asked!
¶ Pod
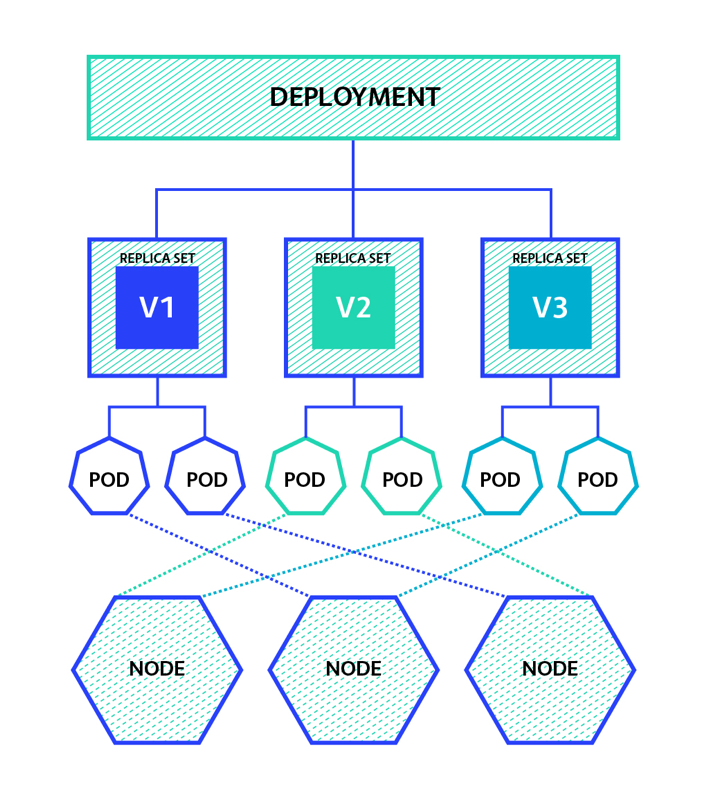
Assuming you already know what a container is: A Pod wraps around a container and gives Kubernetes access to manage it. Technically a pod can also house multiple containers, but that's more advanced and you probabley won't need it.
Keep this in mind, but you probably won't be deploying individual Pods.
¶ Replica Set
A Replica Set is a set of replicated Pods that can be used to balance your traffic onto multiple pods. For this to work your Application has to be stateless: It cannot be dependent on any saved data (inside of itself), because sessions can swap to other Pods. Also when the container is restarted, unless you specifically stored the data, it's lost.
Again, you probably also won't be deploying individual Replica Sets.
¶ Deployments
A Deployment wraps around a Replica Set, which wraps around Pods, and enables lifecycle functionality and more for the Replica Set. Most importantly it manages the deployment and rollout for your Replica Set: When you want to update your pods the old pods are only terminated when all new pods are successfully started.
You will be defining deployments, which includes Definition of Replica Sets and Pods.
¶ Services
On its own a Deployment is still very useless. Useless in the sense that it cannot be accessed (not even from other deployments within the cluster). If it doesn't have to be accessed, you can leave it like that, sure, but if you want to route traffic to your Deployment, from the outside or from other applications you have to define a Service for your Deployment.
A Service basically gives your Deployment a hostname (Remember from Docker Compose?), and exposes the ports that can be accessed. Now with the given hostname and port other applications can communicate with your deployment.
¶ Ingress
Finally if you want (HTTP-)traffic from the outside to be routed to one of your services you would define an Ingress. An Ingress serves as a reverse proxy and routes incoming traffic on Ports 80 and 443 to the applications based on the supplied hostname or path.
¶ Persistent Volume Claims
If you have an application that needs to store some data, you define a Persistent Volume Claim and attach it to your Deployment (actually to the Pod), this stores directories of your deployments and makes them accessible even when the pod is restarted. This is necessary for databases (or similar) to work.
And that's the main things for now. Kubernetes comes with some more Objects like DeamonSets, Jobs, StorageClasses, but you can disregard those for know, or read about it yourself in the official kubernetes documentation.
¶ Hands On
So if you wan't to develop an application for a Kubernetes environment you need to keep this architecture in mind.
First thing you need to do is create a proper Dockerfile for your application, a simple node.js application could be done with something like this:
FROM node:alpine
COPY ./dist /app/dist
COPY ./node_modules /app/node_modules
COPY ./package.json /app/package.json
EXPOSE 3000/tcp
CMD node /app/dist/index.js
Note: Please try to always use alpine or other lightweight base images to keep load light on the server
Next build your application like you would normally (npm run build, make etc...) and then build your Docker image with a proper tag:
docker build -t <imagename>:1.0.0 .
Note: When using the github pkg repository the image name is "pkg.github.com/[username]/[repository]/[tag]"
Try to use semantic versioning on your build tags since this comes in useful later for continous deployment.
When your Dockerimage is built successfully you can continue to push it to your private or public registry. You first need to login with the proper credentials (one time only).
docker login docker.pkg.github.com -u user -p password
and then you can push your image to the registry:
docker push <imagename>:1.0.0
Once your image is deployed to your registry you can define your Kubernetes infrastructure.
apiVersion: apps/v1 #the Resource definition version (not important)
kind: Deployment #what this manifest defines
metadata:
  name: kube-test #name of your deployment
  namespace: kube-test #namespace your deployment will be deployed to
spec:
  selector:
    matchLabels:
      app: kube-test #name of your application again
  replicas: 3 #number of replicas to create
  template:
    metadata:
      labels:
        app: kube-test #name of your application again
    spec:
      containers:
        - name: kube-test #probably name of your appliucation again
          image: docker.pkg.github.com/flomon/kube-test/kube-test:1.4.0 #!Important: the Image of the container to deploy
          resources:
            limits: #Also Important: Define some ressource limits so your application doesn't starve other applications
              memory: 128Mi
              cpu: 500m
          ports:
            - containerPort: 3000 #what port to open
      imagePullSecrets:
        - name: dc-cplqn # The credentials used to pull the image from a private registry (can be entered in rancher)
Then you will need a service to expose your deployment:
apiVersion: v1
kind: Service
metadata:
  name: kube-test
  namespace: kube-test
spec:
  selector:
    app: kube-test #this has to match the name of your deployment
  ports:
    - port: 3000 #external port of the service
      targetPort: 3000 #port at your deployment
And Finally you can define an Ingress to route your traffic to the service:
apiVersion: extensions/v1beta1
kind: Ingress
metadata:
  name: kube-test-ingress
  namespace: kube-test
spec:
  rules:
    - host: test2.kube.floi.ml #the hostname that will route to your application
      http:
        paths:
          - backend:
              serviceName: kube-test #has to match the name of your service
              servicePort: 3000
If any of this is too complicated at first you can also use the Rancher UI to create and deploy these manifests for you, but its important to understand how it works.
I recommend to use the official Kubernetes VSCode plugin by Microsoft to help you create those manifests that will create templates for you. Also the yaml plugin by RedHat provides Kubernetes syntax support.
If you want to understand individual bits of the manifests this tool might help you: Konstellate Editor
¶ CD with Keel
If you want to have Continous Deployment capabilities for your Deployments you just need to add two lines to your deployment manifest:
apiVersion: apps/v1
kind: Deployment
metadata:
  name: wd
  namespace: default
  annotations:
    keel.sh/policy: minor # <-- policy name according to https://semver.org/
    keel.sh/trigger: poll # <-- actively query registry, otherwise defaults to webhooks
This will regularly poll your Registry for new Image versions and deploy them automatically. You can also define webhooks for faster deployments, but for this and more information consult the keel documentation.